Category: 小小草

IT 技术领域学海无涯。其实任何领域都学海无涯,无非 IT 发展太快了,让我有更多嘘唏。希望我掌握的技术有如小小草,虽然渺小,却有旺盛的生命力。

  • Magento extension: rcah 0.2.0 is released

    In previous version of rcah module, if “Use Canonical Link Meta Tag For Categories” is enabled in System >> Configuration >> Catalog >> Search Engine Optimizations,

    and if you set a root category as homepage, the homepage html head outputs a link like

    <link rel=”canonical” href=”http://MY_DOMAIN/catalog/category/view/s/URL_KEY/id/ROOT_CATEGORY_ID/” />

    or if you set a subcategory as homepage (System -> Configuration -> General -> Web -> Default Pages -> Default web URL set to “rcah/index/index/id/SUBCATEGORY_ID”), the homepage html head outputs a link like

    <link rel=”canonical” href=”http://MY_DOMAIN/REWRITED_URL” />

    In the first scenario, the canonical link is invalid because Magento native code won’t allow root category page be accessed. In the second scenario, the canonical link is valid, but it should be “http://MY_DOMAIN/” in either scenario.

    Release 0.2.0 is to fix this problem. Download RootCategoryAsHomepage.tar.gz

    Just for your interest, I was going to write IndexController like this to fix the problem.

    /**
    * most code is from CategoryController::viewAction()
    *
    * run _modifyCanonial() before render layout
    */
    public function indexAction()
    {
    if ($category = $this->_initCatagory()) {
    
    Mage::getModel('catalog/design')->applyDesign($category, Mage_Catalog_Model_Design::APPLY_FOR_CATEGORY);
    Mage::getSingleton('catalog/session')->setLastViewedCategoryId($category->getId());
    
    $update = $this->getLayout()->getUpdate();
    $update->addHandle('default');
    
    if (!$category->hasChildren()) {
    $update->addHandle('catalog_category_layered_nochildren');
    }
    
    $this->addActionLayoutHandles();
    
    $update->addHandle($category->getLayoutUpdateHandle());
    $update->addHandle('CATEGORY_'.$category->getId());


    if ($category->getPageLayout()) {
    $this->getLayout()->helper('page/layout')
    ->applyHandle($category->getPageLayout());
    }
    
    $this->loadLayoutUpdates();
    
    $update->addUpdate($category->getCustomLayoutUpdate());
    
    $this->generateLayoutXml()->generateLayoutBlocks();
    
    if ($category->getPageLayout()) {
    $this->getLayout()->helper('page/layout')
    ->applyTemplate($category->getPageLayout());
    }
    
    if ($root = $this->getLayout()->getBlock('root')) {
    $root->addBodyClass('categorypath-'.$category->getUrlPath())
    ->addBodyClass('category-'.$category->getUrlKey());
    }
    
    $this->_initLayoutMessages('catalog/session');
    $this->_initLayoutMessages('checkout/session');
    $this->_modifyCanonial()->renderLayout();
    }
    elseif (!$this->getResponse()->isRedirect()) {
    $this->_forward('noRoute');
    }
    }
    
    /***
    * Find link_rel item in items of head, and modify it
    *
    * Each item is array of 5 in a format like
    * array('type'=>'link_rel',
    *         'name'=>'http://domain/path',
    *         'params'=>'rel="canonical"',
    *         'if'=>null,
    *         'cond'=>null);
    */
    protected function _modifyCanonial() {
    if ($headBlock = $this->getLayout()->getBlock('head')) {
    $items = $headBlock->getData('items');
    foreach ($items as $key => $value) {
    if (false !== strpos($key, 'link_rel')) {
    if ($value['type'] == 'link_rel' && $value['params'] == 'rel="canonical"') {
    $value['name'] = Mage::getUrl();
    $items[$key] = $value;
    $headBlock->setData('items', $items);
    break;
    }
    
    }
    }
    }
    return $this;
    }
    

    However, just before release, I found a much better way: just use setCategoryUrl in _initCatagory(). So now IndexController is now as:

    protected function _initCatagory()
    {
    Mage::dispatchEvent('catalog_controller_category_init_before', array('controller_action'=>$this));
    $rootCategoryId = Mage::app()->getStore()->getRootCategoryId();
    $categoryId = (int) $this->getRequest()->getParam('id', $rootCategoryId);
    if (!$categoryId) {
    return false;
    }
    
    $category = Mage::getModel('catalog/category')
    ->setStoreId(Mage::app()->getStore()->getId())
    ->load($categoryId)
    //force url as a homepage url to work with canonical link
    ->setUrl(Mage::getUrl());
    
    if ($categoryId == $rootCategoryId) {
    //do nothing. bypass canshow test for root category
    }
    elseif (!Mage::helper('catalog/category')->canShow($category)) {
    return false;
    }
    Mage::getSingleton('catalog/session')->setLastVisitedCategoryId($category->getId());
    Mage::register('current_category', $category);
    try {
    Mage::dispatchEvent('catalog_controller_category_init_after', array('category'=>$category, 'controller_action'=>$this));
    } catch (Mage_Core_Exception $e) {
    Mage::logException($e);
    return false;
    }
    return $category;
    }
    
    public function indexAction() {
    parent::viewAction();
    }
    
  • Install SSL certificate on Nginx step by step

    Although I have installed SSL certificates for several times, every time I google step by step guide. So now I take my own note:

    Step 1: Generate key

    $ openssl genrsa -des3 -out verisign-mydomain.co.uk.key 1024
    Generating RSA private key, 1024 bit long modulus
    ………………….++++++
    …………………++++++
    e is 65537 (0x10001)
    Enter pass phrase for verisign-mydomain.co.uk.key:
    Verifying – Enter pass phrase for verisign-mydomain.co.uk.key:

    Step 2:  Remove pass phrase from key (otherwise Nginx asks for pass phrase every time it starts)

    $ openssl rsa -in verisign-mydomain.co.uk.key -out verisign-mydomain.co.uk.no-passphrase.key
    Enter pass phrase for verisign-mydomain.co.uk.key:
    writing RSA key

    Step 3: Generate CSR

    $ openssl req -new -key verisign-mydomain.co.uk.no-passphrase.key -out verisign-mydomain.co.uk.csr
    You are about to be asked to enter information that will be incorporated
    into your certificate request.
    What you are about to enter is what is called a Distinguished Name or a DN.
    There are quite a few fields but you can leave some blank
    For some fields there will be a default value,
    If you enter ‘.’, the field will be left blank.
    —–
    Country Name (2 letter code) [GB]:
    State or Province Name (full name) [Berkshire]:E Sussex
    Locality Name (eg, city) [Newbury]:Brighton
    Organization Name (eg, company) [My Company Ltd]:Euro Ltd
    Organizational Unit Name (eg, section) []:
    Common Name (eg, your name or your server’s hostname) []:mydomain.co.uk
    Email Address []:

    Please enter the following ‘extra’ attributes
    to be sent with your certificate request
    A challenge password []:
    An optional company name []:

    Step 4: Send CSR to authority and get CRT

    Step 5: Download CA intermediate certificate from authroity

    Step 6: Concatenate CA intermediate certificate with CRT (CRT on top)

    $ cat ca.crt >> my.crt

    Step 7: Make necessary changes to Nginx configuration

    Nginx only need two file: my.crt (concatenated) and verisign-mydomain.co.uk.no-passphrase.key

  • Magento custom module frontend url is forced to https. Why?

    If secure url is enable, sometimes Magento custom module frontend url is forced to https but that’s not what I am intended to. I look into it and find it happens when it uses an identical router frontName both for <frontend> and <admin>.

    The module etc/config.xml is like this:

    
    <?xml version="1.0" encoding="UTF-8"?>
    <config>
    <modules>
    <Mynamespace_Mymodule>
    <version>0.1.0</version>
    </Mynamespace_Mymodule>
    </modules>
    <frontend>
    <routers>
    <mymodule>
    <use>standard</use>
    <args>
    <module>Mynamespace_Mymodule</module>
    <frontName>mymodule</frontName>
    </args>
    </mymodule>
    </routers>
    </frontend>
    <admin>
    <routers>
    <mymodule>
    <use>admin</use>
    <args>
    <module>Mynamespace_Mymodule</module>
    <frontName>mymodule</frontName>
    </args>
    </mymodule>
    </routers>
    </admin>
    </config>


    If frontend router is changed to something different from admin router (change both frontName and routers xml tag name), then the frontend is not redirected to https. If only frontName is different but routers xml is identical, then {{store url=”router_xml_tag/controller/action”}} results an admin frontName; if only routers xml is different but frontName is identical, then frontName is still forced to https.

    What if a module does require a secured connection for <frontend> without <admin>? Just add <secure_url> tag inside <frontend> tag. A sample like this:

    
    <?xml version="1.0" encoding="UTF-8"?>
    <config>
    <modules>
    <Mynamespace_Mymodule>
    <version>0.1.0</version>
    </Mynamespace_Mymodule>
    </modules>
    <frontend>
    
    <secure_url>
    <mymodule>/mymodule/</mymodule>
    </secure_url>
    
    <routers>
    <mymodule>
    <use>standard</use>
    <args>
    <module>Mynamespace_Mymodule</module>
    <frontName>mymodule</frontName>
    </args>
    </mymodule>
    </routers>
    
    </frontend>
    
    
  • Precisely control modules loading sequence in Magento

    Magento 以 alphabetical 顺序加载 app/etc/modules 里的模块。一般来说,我喜欢在我的模块.xml 前加一个 z,保证我的模块是最后加载的,因为我的模块或许需要去更改原有的布局,那当然得在原有的布局已经生成后才去更改。

    我发现不少人跟我有同样想法——喜欢把他们发布的模块.xml 前加 z,有时还加 zz,甚至 zzz。这样就难为我啦,我倾向于去掉这些强加的 z,毕竟是我在统一调配模块。

    如果我发布我的模块,我倒不喜欢加 z,因为我不喜欢被人加,己所不欲勿施于人。而且,既然是独立发布的模块,应该尽量做到环境无关化。我不可能知道用户已经装有什么模块、将来还会装什么模块,我尽我本分,不管别的模块能否做到环境无关化。

    言归正传。今天我把 jQuery 和一些常用的 jQuery plugins 打了包,放进我的 Msdk (Magento Software Development Kit) 模块。目前 layout 的 msdk.xml 是这样的:

    <?xml version="1.0" encoding="UTF-8"?>
    <layout version="0.1.0">
    <default>
    <reference name="head">
    <!-- add jQuery and plugins -->
    <action method="addJs">
    <script>jquery/jquery-1.4.2.noConflict.min.js</script>
    </action>
    <action method="addJs">
    <script>jquery/jquery.textareaCounter.plugin.js</script>
    </action>
    <action method="addJs">
    <script>jquery/jquery.corner.js</script>
    </action>
    <action method="addJs">
    <script>jquery/jquery.transform-0.6.2.min.js</script>
    </action>
    </reference>
    </default>
    </layout>
    

    接着又发现我其他用到 jQuery 的模块无法使用 jQuery,因为它们按 alphabetical 顺序加载在 msdk 模块之前。这让我头痛。Add block 时有 before, after 参数可以控制插入顺序,addJs 没有优先参数,而我又不愿意修改 app/etc/modules 下各个 xml 文件名去控制模块加载顺序(除非我自个儿用 msdk)。

    继续琢磨,磨出一个两全其美的办法:参考 Magento 的 Eav 模块,在用到 msdk 的模块加载时使用 <depends>。

    <config>
    <modules>
    <Mage_Eav>
    <active>true</active>
    <codePool>core</codePool>
    <depends>
    <Mage_Core />
    </depends>
    </Mage_Eav>
    </modules>
    </config>
    

    我早注意到 <depends> 这个 tag,以前觉得它可有可无(我是拿它跟 yum dependency 机制作比较,Magento depends 无法自动解决依赖,所以觉得它可有可无),没想有这等妙用。

  • Smtp through my server in gmail

    Google recommend sending through SMTP servers for professional domains. In most cases, it is not necessary unless you do not want your email recipients pick up your primary Google Apps domain information when you use “send mail as” facility.

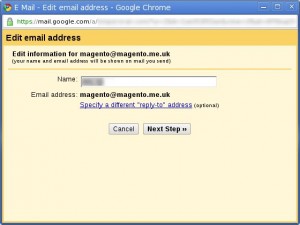
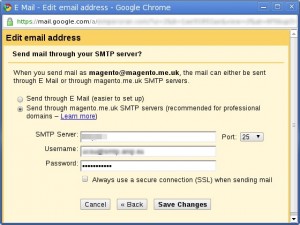
    All you need is getting a SMTP server ready to work with Google. Setup in Gmail is quite easy.

    Set my own SMTP in Gmail Step 1
    Set my own SMTP in Gmail Step 1
    Set my own SMTP in Gmail Step 2
    Set my own SMTP in Gmail Step 2

  • 1and1 server London zoneinfo is invalid

    I can not believe it! One of the files come with 1and1 CentOS server installation is invalid. I do not know whether other types of servers from 1and1 have the same situation, but I am using 1and1 cloud server 64bit. The damaged file is /usr/share/zoneinfo/Europe/London. Every method I tried to set timezone to London (for now it is BST: British Summer Time), the system resets it to EDT: Eastern Daylight Time.

    Normally I know how to set timezone on server, but cloud server is new to me. So when I see my methods do not work, my first reaction is looking for some secret method that works on cloud server. I have tried different ways to set timezone before I ever think about the London zoneinfo file is invalid. In a total hopelessness, I upload my PC’s /usr/share/zoneinfo/Europe/London from Fedora to CentOS, and it works.

    Other zoneinfo files are OK as I observed.

  • My approach to a live chat extension for Magento

    试用了两个 Magento live chat extension,都不怎么好用。

    一个是 Luxe_Yalc,基于 Google chatback,是我想要的,因为 Android 手机可以让我 7/24 在线。可惜 Luxe_Yalc 试图凭用户输入 Google Account 的信息去获取 Google chatback html,但有 bug,至少在我机器上运行获取不了那段 html。我想写个 Magento live chat extension 用不着这么复杂,直接让用户自行登录 Google Account,拷贝出 chatback html,粘帖入 Magento 后台就可以。这样做的好处是,只要 Google 继续支持 chatback,怎么改变 chatback html,用户都能应变。

    一个是 MagentoLiveChat,基于本地服务器的 live chat,不依赖于第三方服务,精神可嘉。看上去功能很多,还支持多个 operators。但我想还是等到企业发展壮大到需要多个在线客服的阶段再考虑这个 extension。

  • Magento 1.4.2.0 extension key change

    今天有闲,下载了 Magento 1.4.2.0 beta 1 来体验,同时用 Magento Connect 安装了几个 livechat extension 来体验。其实我不太喜欢 Magento Connect 来安装 extension(曾经很喜欢),因为:

    • 很多时候仅在 Magento fresh installation 可用,随着安装的扩展越来越多、Magento 自身的升级,过一段时间后想再用 Magento Connect 安装点什么就发现启动不了;
    • 用 Magento Connect 升级 Magento 自身也不可靠,碰到几次在升级过程中断,造成前后台全部瘫痪,只好用传统的 ssh 或 ftp 安装来升级。

    说远了。因为 Magento Connect 里的 extensions 只能用 Magento Connect 来安装(或许有别的办法?),我就老老实实拷贝了 extension key 粘贴,结果 Magento Connect 拒绝工作,说“couldn’t resolve host”,我晕了一下,不过很快找到原因:

    Magento 1.4.2.0 起把 extension key 的规则改了,比如从 magento 网站上找来 extension key

    magento-community/EXTENSION_NAME

    应稍作修改,改成能被 Magento 1.4.2.0 认可的 extension key

    http://connect20.magentocommerce.com/community/EXTENSION_NAME

  • Magento extension: bxgy 0.1.1 is released

    Bxgy 0.1.0 is reported fail to work when raising orders from backend. It is because of

    
    $quote = Mage::getSingleton('checkout/cart')->getQuote();
    

    Now

    
    $quote = $item->getQuote();


    for bxgy rule to process regardless whether quote is frontend or backend.

    Download bxgy 0.1.1BuyXGetY.tar.gz

    2011/02/21 Update: please checkout a newer release. Always leave comments on the newest release post. The comment on this post is closed.

  • Magento user be warned: eav_entity_store has realtime sales data

    最近在一个 Magento 网站上大幅调整了 catalog structure。我先在测试服务器上调整产品属性、目录属性等,然后把测试服务器数据库里所有 catalog 和 eav 开头的表导入到生产服务器。因为生产站点的销售没有中断,我不能简单地从测试服务器往生产服务器导入整个 magento 数据库。

    这次升级初看很成功,随后就发现百密中有一疏。我装有 protx standard (for SagePay Form integration),顾客在重定向到 SagePay 付款时,表单预填的数据是别人的。原因是测试服务器的跟销售有关数据是生产服务器若干天前的,eav_entity_store 表里保存有 increment_last_id,我从测试服务器往生产服务器导入所有 catalog 和 eav 开头的表,导致 magento 再次分配几天已分配过的 order ID 给新订单。如果顾客在重定向到 SagePay 后点击 cancel,会导致同订单号的老订单 status change to cancelled。

    ID 重复是一个很低级的错误,我不应该去导入 eav_entity_store 表。我是知道这张表的作用的,这个错误应该归咎于我考虑不周到。

    Protx standard 这个模块也不够周到,我用的版本比较老,不知新版是否在这方面有改进。