我不用 Apache 很多年,几乎忘了该怎么完整地配一台 Apache server。最近上线了一台 FreePBX,我想加强 web server 的安全系数,要修改一些默认参数。因为对 FreePBX 还不是很了解,所以不敢贸然把它的 web server 用我喜欢的 Nginx 代替,只好沿用元配的 Apache,捣腾它的 conf 文件。
首先,我想弄个 VirtualHost,把 FreePBX admin 界面隐藏到不公开的 ServerName 上。我忘了在使用 name based virtual host 前要先使用 NameVirtualHost 先声明一下。
NameVirtualHost ip_address:port_number
其次,启用了 VirtualHost 以后,VirtualHost 之外的 main DocumentRoot 就不起作用了。我在 VirtualHost 之外定义了一个 DocumentRoot 并想当然地认为它是 default server (未经任何一个 VirtualHost 定义的 server)的 DocumentRoot。事实上,VirtualHost 的 default server 是由 _default_ 显式定义,或在 _default_ 缺失的情况下,第一个 VirtualHost 就是 default server。
Warning: include_once(Net/SMTP.php): failed to open stream: No such file or directory in mail/Mail/smtp.php on line 348
PHP Warning: include_once(): Failed opening ‘Net/SMTP.php’ for inclusion (include_path=’.:/usr/lib/php’) in mail/Mail/smtp.php on line 348
PHP Fatal error: Class ‘Net_SMTP’ not found inmail/Mail/smtp.php on line 349
It is my second time using Avery Quick&Clean™ DIY business cards. The first time was very smooth so I did not remember any caveats.
This time I had printed 5 pages before I got a nice one. So I decide to write some tips for future reference.
The paper I use is Avery C32026, 270g satin finish, the thickest I can find in store. The printer is Lexmark C544dn, a colour laser printer with auto duplex feature.
Tip 1. Do not load paper in Tray 1. It is not suitable for thick paper like this. Load it in Manual Feeder.
Tip2. Do not use auto duplex. If the business card design is double sided, print one side and manually feed paper again for the other side. The auto duplex roller is a small cylinder that may snap the cards away from the frame.
Tip 3. Use the template provided by Avery and do not convert to any other format. C32026 template is a Word document. After editing, I converted it to a PDF file (I was thinking of portability). The position was changed slightly and some text was printed across the border.
Last month I set up a development server using Fedora 20. On that server I wanted to change MySQL socket file from /var/lib/mysql/mysql.sock to /dev/shm/mysql.sock. Basically I wanted to move MySQL socket file to shared memory for performance gain.
I made the change in /etc/my.cnf, but when I tried to start mysqld, I got the error message:
Job for mariadb.service failed. See ‘systemctl status mariadb.service’ and ‘journalctl -xn’ for details.
That was my first time heard about mariadb. I did some background research on mariadb and the relationship between mysqld and mariadb. But that did not help to solve the problem. So I had to revert to the default MySQL socket file /var/lib/mysql/mysql.sock.
Today I had some free minutes and recalled this unresolved issue. To my surprise, I just changed
socket=/var/lib/mysql/mysql.sock
to
socket=/dev/shm/mysql.sock
in /etc/my.cnf. And this time mysqld can start without any errors.
What changes have I made to the system? Nothing but a yum update.
So I assume there was a bug in mariadb (or mysqld) which is fixed by the recent release.
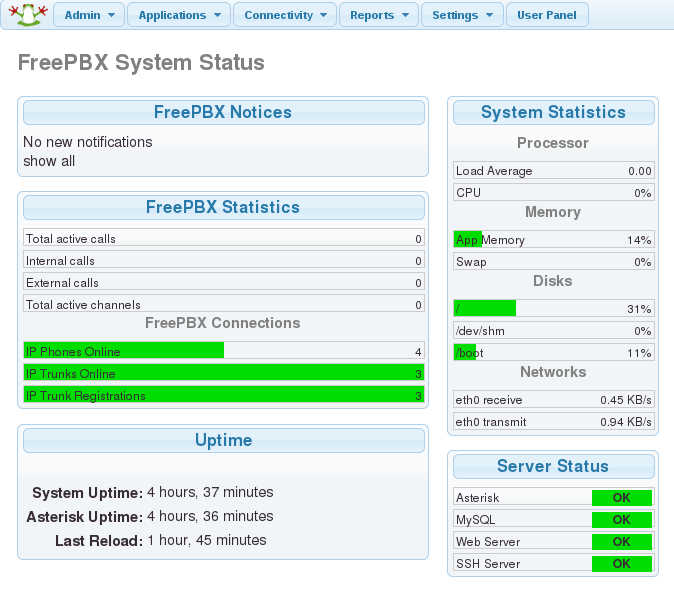
办公室里的 FreePBX 经过多次调试,初步可以稳定运行。无奈物业管理公司配送的 ZyXEL AMG1302-T10A ADSL router 是个家用系列产品,用起来非常糟糕:设置了一批端口转发至 FreePBX,但会莫名其妙地失效。这种失效是个别端口转发失效,最要紧的是 Asterisk bind port 失效,这样外网的 SIP 分机就注册不了,运行若干天定会发生这样的事故。联想到外网分机通话时经常出现的单向语音或干脆无语音,估计也是路由器无法稳定地转发 RTP port 造成的。
物业管理公司外包 IT support 给一个外地的公司,虽然离得不远,但英国公司本身就效率低下,又不是在同一个城市,根本就指望不上。本来我也不指望别人来做 IT support,但物业管理公司和 IT support 公司不愿告诉我 ADSL 上网密码,我就无法换掉它的路由器;它也不愿告诉我路由器管理密码,搞得我在路由器端口转发失效的情况下,也无法远程重启路由器。
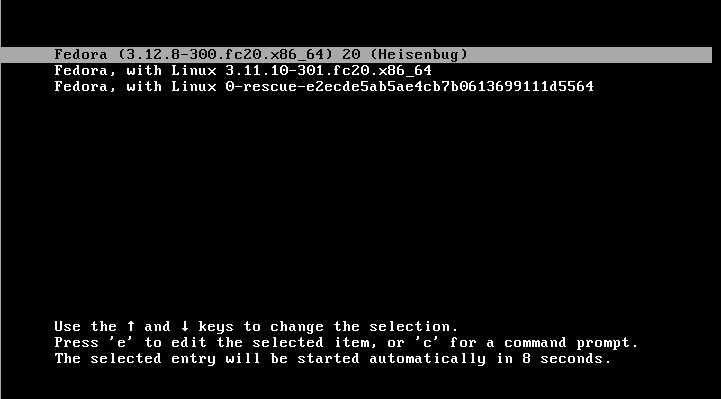
Changing Grub timeout seconds is not as many people said, by edit /etc/default/grub. At least with Fedora 20, I can proove it is not the right place to make the change. The corresponding file is /boot/grub2/grub.cfg. In the file look for
set timeout=5
5 seconds is the default timeout. Change it to any seconds you want it to be.
set timeout=0
0 seconds means no waiting at all.
set timeout=-1
-1 means wait infinite seconds until you make a choice.
(My updated knowledge on 06 Feb 2014) /boot/grub2/grub.cfg 是针对 BIOS systems 的,UEFI systems 要修改 /boot/efi/EFI/fedora/grub.cfg。修改 grub.cfg 文件后直接生效,但是不建议直接修改 grub.cfg 文件。grub.cfg 的文件头上就有一段这样的提示:
#
# DO NOT EDIT THIS FILE
#
# It is automatically generated by grub2-mkconfig using templates
# from /etc/grub.d and settings from /etc/default/grub
#